How Do You Build an Inexpensive Walk-In Farm Cooler Using a Window A/C and CoolBot?

How Do You Build an Inexpensive Walk-In Farm Cooler Using a Window A/C and CoolBot?
Ask any experienced market grower where commercial farm profits are won or lost, and they will point directly to the post-harvest cold chain.
You can spend four months building pristine biological soil, dialing in drip irrigation lines, and hand-weeding forty beds of Salanova lettuce. But the second you slice a head of lettuce from its taproot on an eighty-degree June morning, a biological countdown begins. The vegetable is suffocating. Its cellular respiration spikes, burning through stored sugars and transpiring moisture into the atmosphere.
If you do not pull that field heat out of the crop and drop its core temperature below 38°F (3°C) within two hours of cutting, its commercial shelf life drops by half. Within three days, crisp, sweet greens turn limp, bitter, and unmarketable.
For backyard gardeners stepping into commercial market gardening, cold storage is the single most terrifying financial hurdle. If you call a commercial HVAC refrigeration contractor and request a quote for an eight-by-eight-foot walk-in produce cooler, prepare for sticker shock. A traditional commercial condensing unit, evaporator fan coil, copper line set, and installation labor will run between $8,500 and $14,000. For a bootstrapped grower farming a quarter or half-acre, taking on a ten-thousand-dollar equipment debt before making your first thousand dollars of sales is economic suicide.
Enter the CoolBot controller.
Invented in 2006 by an organic vegetable grower named Ron Khosla, the CoolBot is a microprocessor-driven electronic device that digitally overrides a standard residential window air conditioner. It tricks an ordinary $400 window unit into chilling an insulated walk-in room down to 34°F (1°C) without freezing the evaporator coils into a solid block of ice.
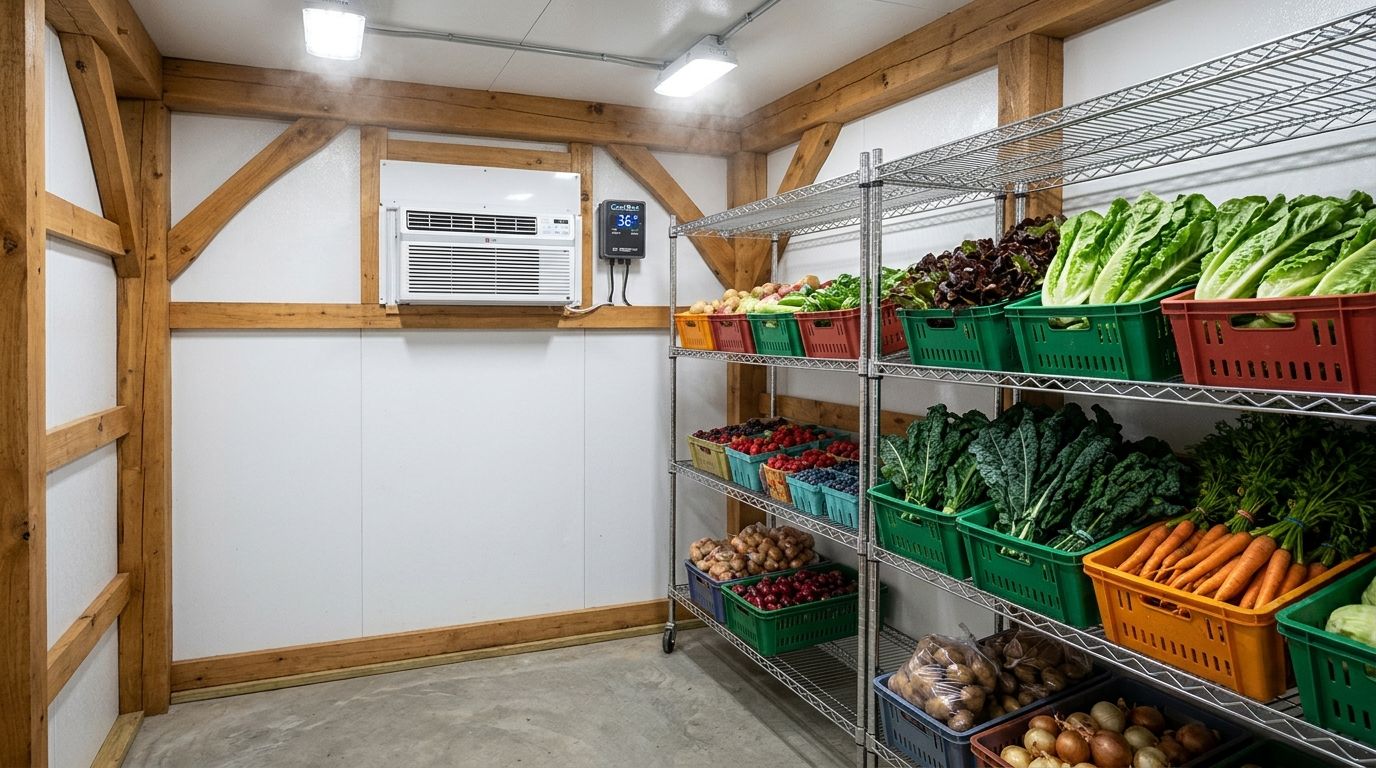
Instead of spending $12,000 on commercial refrigeration, you can build an airtight, heavy-duty, eight-by-eight-foot walk-in farm cooler inside your barn, garage, or shed for roughly $1,500 to $2,200 in total materials—including the framing, R-25 insulation, exterior steel door, window A/C, and the CoolBot unit itself.
I built my first CoolBot walk-in cooler back in 2009 in a shaded corner of our packing shed down here in Alabama. That cooler ran non-stop through blistering 98-degree Southern heat waves for eight consecutive years on a single $380 Frigidaire window air conditioner. When the compressor finally died after nearly a decade of constant commercial abuse, I did not have to wait three days for an emergency refrigeration technician charging $180 an hour; I drove fifteen minutes to Home Depot, bought a replacement window unit off the shelf for $360, slid it into the wall sleeve, plugged the CoolBot back in, and was chilling at 36°F before noon.
This technical guide walks through every step of engineering, framing, insulating, wiring, and maintaining a high-performance DIY walk-in farm cooler that will safeguard your harvest for years to come.
The Thermodynamics of the CoolBot: How and Why It Works
To appreciate why the CoolBot is an engineering marvel, you must understand how residential air conditioners are built and why they fail when asked to act as refrigerators.
Why a Window A/C Shuts Down at 60°F
A residential window air conditioner contains a surprisingly powerful refrigeration system. A 12,000 BTU window unit moves an enormous volume of heat. However, manufacturer firmware restricts residential A/C units from cooling below 60°F (15.5°C).
Inside the front plastic grill of every modern window air conditioner sits a tiny copper bead called a thermistor (ambient temperature sensor). This sensor measures room air temperature. When the room drops to the temperature you set on the digital display (say, 62°F), the internal computer cuts power to the compressor, letting only the fan run.
Even if you could manually adjust the thermostat dial down to 36°F, the unit would quickly destroy itself. A standard window air conditioner's aluminum cooling fins operate below freezing. In normal residential use (cooling an 80°F room down to 72°F), warm room air blowing across the fins melts any slight ice accumulation instantly.
However, in an enclosed cold room where the ambient air drops below 45°F, moisture pulled from the air begins condensing and freezing onto the cooling fins faster than it can melt. Within thirty minutes, ice accumulates between the aluminum fins, choking off airflow completely. With zero airflow, the evaporator coil drops to zero degrees, turning the entire unit into a solid block of white ice and burning out the compressor motor.
How the CoolBot Digitally Hacks the System
The CoolBot does not modify the high-voltage internal wiring of the air conditioner. It uses an elegant, non-invasive dual-sensor feedback loop:
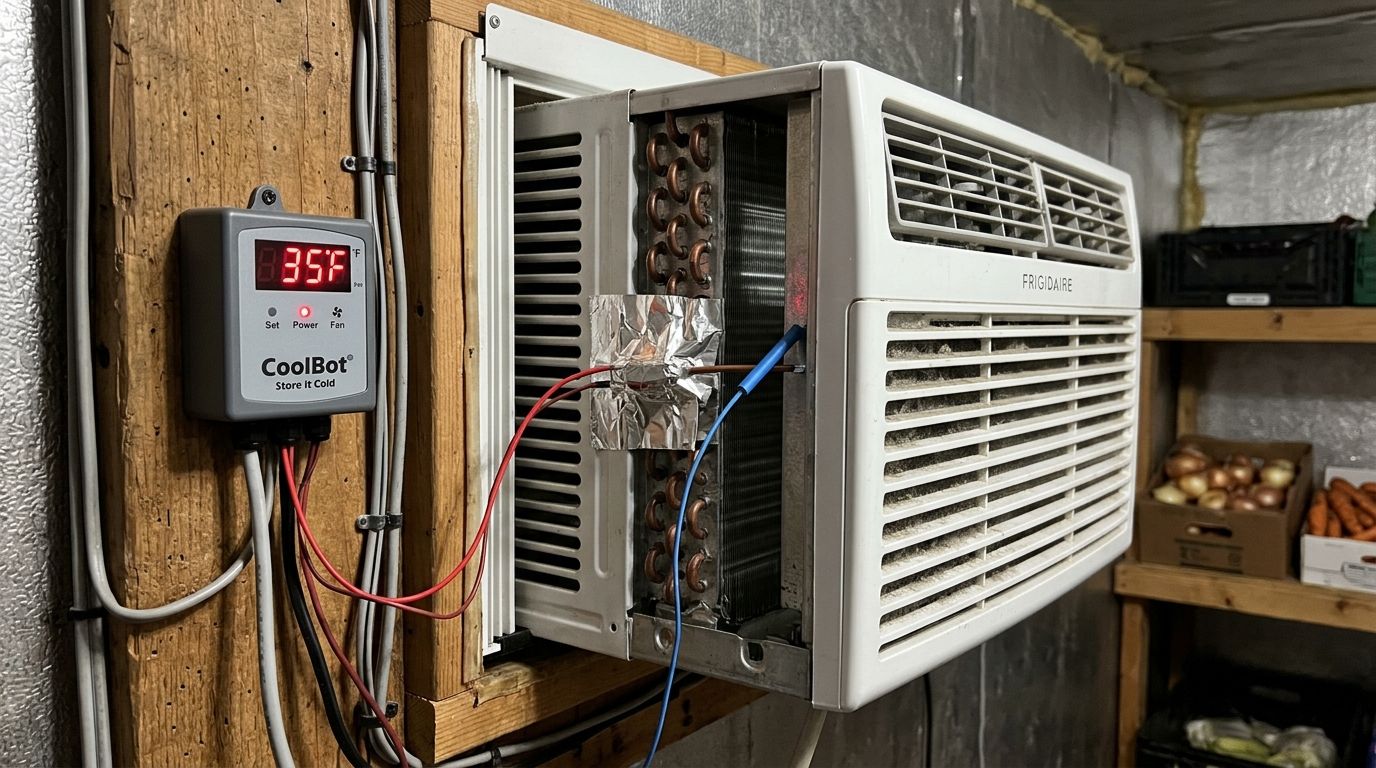
- The Artificial Heating Element: The CoolBot has a small probe with a micro-heating element attached to it. You tape this CoolBot heating probe directly against the air conditioner's native temperature thermistor using aluminum foil tape.
- Tricking the Thermistor: When the room air is 42°F and your target temperature is 36°F, the CoolBot gently warms the A/C's native thermistor, convincing the air conditioner that the room is actually 72°F. The air conditioner's onboard computer thinks: "It's hot in here! Keep the compressor running at full blast!"
- The Secondary Frost Sensor Probe: Here is where the genius lies. The CoolBot includes a secondary sensitive temperature probe that you insert 1/2-inch directly between the aluminum fins of the evaporator coil.
- Preventing Ice Formation: As the air conditioner runs and pulls the room down toward 34°F, the CoolBot continuously monitors the physical temperature of the aluminum fins. The millisecond the fins drop to 32°F and are about to freeze over, the CoolBot turns off its micro-heating element. The air conditioner's native sensor immediately feels the cold ambient air and shuts off the compressor, leaving only the fan running.
- The Melt Cycle: The high-velocity fan blows 38°F room air across the frosty fins, melting any micro-frost in thirty to sixty seconds and blowing that moisture back into the room as high-humidity air. The moment the fins warm back up to 34°F, the CoolBot re-engages the heating element, the compressor kicks back on, and the cooling cycle resumes.
The result is continuous, safe cooling down to 34°F (1°C) with zero coil freeze-up, utilizing an inexpensive off-the-shelf appliance.
Sizing Your Cooler: Room Geometry, R-Value, and A/C BTU Matching
Before picking up a hammer, you must match your physical room footprint, your target insulation level, and your air conditioner's BTU cooling capacity. Under-sizing your air conditioner or shortchanging your insulation will cause the compressor to run 100% of the time, driving up your power bill and burning out the unit in its first season.
The Golden Rule of Insulation: Minimum R-25
Traditional home bedrooms are insulated to R-13 in walls and R-30 in attics, where the goal is maintaining a comfortable 72°F against a 90°F outdoor ambient temperature (an 18-degree temperature differential, or Delta-T).
In a walk-in produce cooler, you are holding the room at 36°F against outdoor summer temperatures that frequently reach 95°F to 100°F. Your Delta-T is 60 to 65 degrees Fahrenheit.
To maintain that massive thermal gradient without excessive electrical load, you must achieve a continuous, unbroken insulation envelope of at least R-25 in the walls and floor, and R-30 in the ceiling.
| Cooler Footprint | Usable Internal Volume | Max Harvest Lug Capacity | Recommended Insulation | Optimal A/C Capacity (BTU) | Typical Daily Energy Draw |
|---|---|---|---|---|---|
| 6x6-Foot Room (7 ft ceiling) | ~200 cubic feet | 24 - 30 harvest lugs | Walls: R-25 / Ceiling: R-30 | 8,000 - 10,000 BTU | 8 - 12 kWh / day ($1.20 - $1.80) |
| 8x8-Foot Room (8 ft ceiling) | ~400 cubic feet | 48 - 60 harvest lugs | Walls: R-25 / Ceiling: R-32 | 12,000 - 15,000 BTU | 14 - 18 kWh / day ($2.10 - $2.70) |
| 8x12-Foot Room (8 ft ceiling) | ~600 cubic feet | 80 - 100 harvest lugs | Walls: R-28 / Ceiling: R-35 | 18,000 - 24,000 BTU (220V) | 22 - 28 kWh / day ($3.30 - $4.20) |
For most quarter-acre to one-acre commercial market gardens, an 8x8-foot walk-in cooler outfitted with a 12,000 to 15,000 BTU window air conditioner represents the sweet spot of construction cost, operational efficiency, and spatial capacity.
Air Conditioner Compatibility Checklist
Not every air conditioner works with a CoolBot. Before buying an A/C unit, verify these non-negotiable technical requirements:
- Digital Controls Only: The air conditioner must have digital buttons and a digital LED temperature readout. Old mechanical knob units will not work because they lack the digital thermistor sensor.
- Standard Rotary Compressor (No Inverters!): This is critical. In recent years, manufacturers have introduced "Inverter" or "Variable-Speed" window air conditioners (such as the Midea U-Shaped inverter units). Do NOT use inverter air conditioners with a CoolBot. Inverter compressors modulate frequency based on complex algorithms and will error out or refuse to run at full power when manipulated by external sensors. You want a traditional, single-stage rotary compressor unit (brands like LG, Frigidaire, Danby, and GE are the industry standards).
- Auto-Restart Function: Ensure the unit features an automatic restart memory. If a thunderstorm causes a momentary power blink at 2:00 AM, the A/C must automatically power back on and resume cooling without someone having to press the power button.
Construction Blueprint: Framing, Thermal Isolation, and Vapor Sealing
A walk-in cooler is essentially a giant insulated ice chest. Any air leaks or thermal bridges will bleed heat into the room and allow warm, moist outdoor air to infiltrate your wall cavities, causing mold, rotting lumber, and soaked insulation.
Step 1: Choosing the Insulation Medium
When building a CoolBot cooler, you have two primary insulation choices:
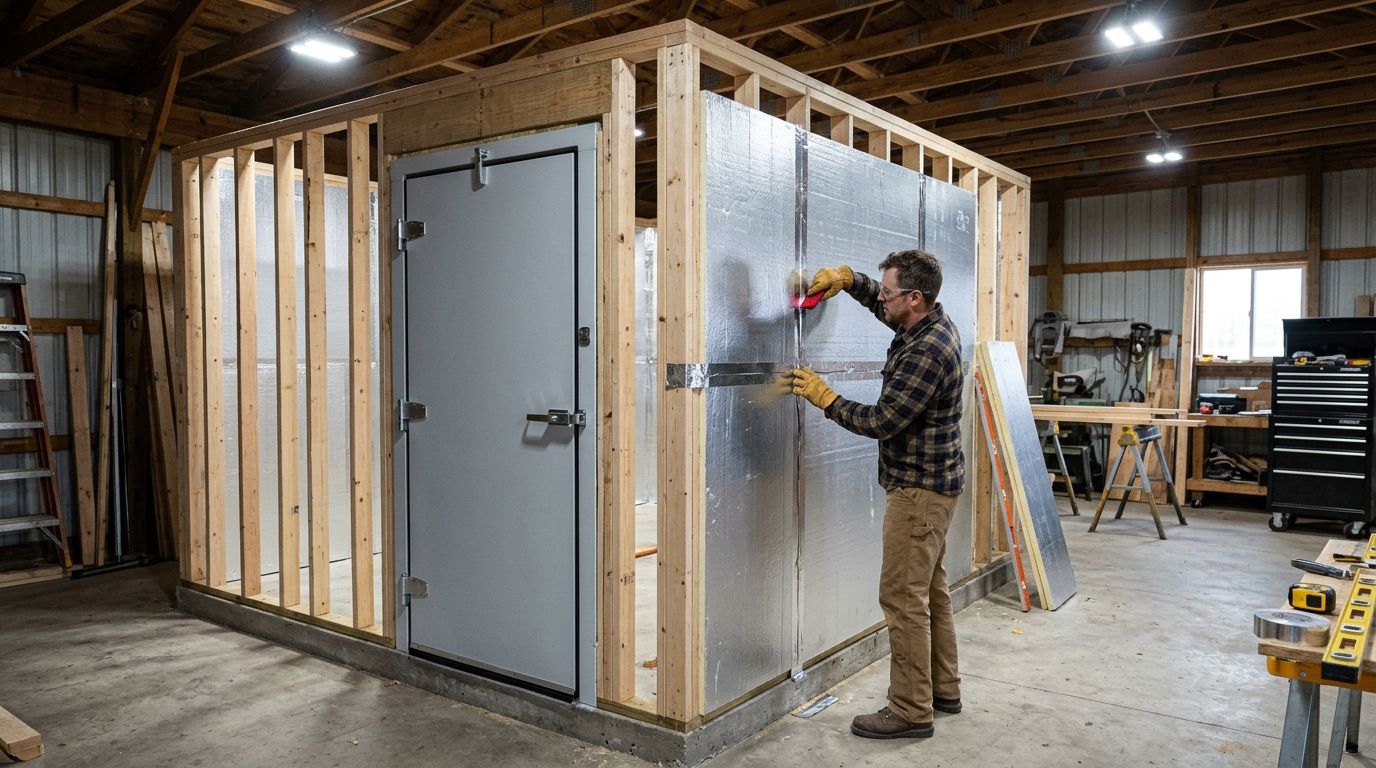
- Foil-Faced Polyisocyanurate (Polyiso) Rigid Foam: This is the gold standard for DIY coolers (sold under brand names like Thermax or Rmax). At R-6.5 per inch, two layers of 2-inch polyiso boards deliver an outstanding R-26 thermal barrier. The reinforced aluminum foil facing acts as an impermeable Class I vapor retarder, reflecting radiant heat away from the cold envelope.
- Expanded Polystyrene (EPS) / Extruded Polystyrene (XPS): EPS (white beadboard, R-4 per inch) or XPS (pink or blue board, R-5 per inch) can be used, but requires 5 to 6 inches of total thickness to achieve R-25, slightly reducing internal room volume.
Avoid fiberglass batts. In a cold room environment, moisture inevitably penetrates fiberglass, destroying its R-value and creating a dark, damp haven for toxic mold.
Step 2: Framing the Walls and Ceiling
Frame the perimeter walls inside your barn or shed using standard 2x4 SPF studs spaced 24 inches on-center:
- Thermal Decoupling: Build the cooler walls at least 2 inches away from existing exterior barn or garage walls. This continuous air gap prevents thermal conduction from hot exterior metal siding directly into your cooler framing.
- Staggered Seams: Install two layers of 2-inch rigid foam boards. Install the first layer between the studs or directly to the exterior of the framing. Install the second 2-inch layer over the face, staggering all vertical and horizontal seams by at least 12 inches. Staggering the seams ensures there is not a single direct straight-line air path from the outside world into the cold room.
- Sealing Every Penetration: Use expanding polyurethane spray foam (such as Great Stuff Pro) to fill every gap around corners, plates, and studs. Once cured, shave it flush with a utility knife and seal every single seam with heavy-duty aluminum foil HVAC tape (UL 181A-P certified). Press the tape firmly with a plastic squeegee to create a permanent, airtight bond.
Step 3: Insulating the Floor (The Most Ignored Thermal Leak)
Backyard growers frequently make the mistake of building their cooler walls on a bare concrete garage floor, assuming concrete is cold.
Bare concrete in summer acts as a massive thermal heat sponge. Deep ground temperatures sit at 55°F to 60°F, conducting continuous heat upward into your 36°F cooler. Leaving the floor uninsulated forces your air conditioner to run 25% longer every single day.
- The Floating Insulated Floor: Lay two layers of 1.5-inch R-10 XPS rigid foam board directly across the clean concrete slab.
- The Wear Deck: Cover the foam with two layers of 1/2-inch exterior-grade plywood laid in opposite directions (cross-laminated) and screwed together. Do not screw into the concrete through the foam; let the floor float.
- Surface Protection: Paint the top plywood deck with heavy-duty oil-based porch and floor enamel, or install non-slip commercial vinyl sheet flooring with sealed seams. This allows you to roll heavy hand trucks and mop up spilled wash water without rotting the subfloor.
Step 4: The Cooler Door and Magnetic Gaskets
Over 30% of thermal heat gain in a walk-in cooler occurs around the door perimeter. A loose, warped wooden door with drafty weatherstripping will ruin an otherwise flawless cooler build.
- Option A: Pre-Hung Insulated Exterior Steel Door ($250 - $350): Buy a standard 32-inch or 36-inch pre-hung exterior residential steel entrance door with an insulated polyurethane foam core. Ensure the door sweeps and weatherstripping seal tightly against the threshold. Add a secondary heavy magnetic latch or commercial walk-in latch to hold the door firmly compressed against the jamb.
- Option B: Custom Built Insulated Door: Build a flush door frame from 2x4s skinned on both sides with 1/2-inch exterior plywood and packed internally with 3.5 inches of polyiso foam. Install commercial PVC walk-in refrigerator gasket seals around the perimeter to create an airtight magnetic seal.
- Vinyl Strip Curtains (MANDATORY): Hang heavy, clear overlapping PVC strip curtains across the interior doorway frame. When you open the main door to roll in twenty crates of lettuce during a 95°F afternoon, the clear vinyl strips prevent the dense 36°F air from pouring out onto the floor like water from an open bucket.
For deeper technical blueprints, psychrometric airflow models, and moisture dynamics in agricultural cold rooms, consult the University of Vermont Extension Agricultural Engineering Cold Storage Guides, led by extension engineer Chris Callahan.
Wiring and Calibrating the CoolBot Controller
Once your insulated room is framed, sealed, and the window air conditioner is securely mounted in its rough opening, connecting the CoolBot takes less than fifteen minutes with zero electrical wiring tools.
Mounting the Unit and Sensor Connections
The CoolBot comes with three color-coded wire leads emerging from the bottom of the controller housing:
CoolBot Wiring Architecture
├── Lead 1: 12V DC Power Supply (Plugs into standard 110V wall outlet)
├── Lead 2: Room Ambient Temperature Sensor Probe (Hangs free in cooler air)
├── Lead 3: Micro-Heating Element Probe (Taped directly to A/C native thermistor)
└── Lead 4: Secondary Frost Sensor Probe (Inserted into A/C aluminum evaporator fins)
- Mounting the Housing: Screw the CoolBot controller bracket to the wooden wall framing 12 to 18 inches to the side of the air conditioner at eye level.
- Accessing the A/C Thermistor: Unclip the front plastic intake grill of your window air conditioner. Locate the small plastic clip holding the air conditioner's native thermistor (the small teardrop-shaped sensor with two thin wires) in front of the aluminum cooling fins. Gently unclip it so it hangs free.
- Mating the Heating Sensor: Take the CoolBot's red heating element probe and place it directly alongside the air conditioner's native thermistor. Wrap both probes together tightly in a 2x3-inch piece of standard kitchen aluminum foil, followed by a wrap of aluminum foil tape. Do not use black electrical tape, which insulates heat poorly; aluminum foil ensures efficient thermal conduction between the CoolBot heater and the A/C sensor.
- Inserting the Frost Sensor: Take the blue CoolBot frost sensor probe. Gently slide the tip of the probe 1/2-inch to 1-inch deep between the aluminum cooling fins near the bottom-center of the evaporator coil, where refrigerant tubes enter the unit. Be gentle; do not puncture the copper refrigerant lines. The probe must touch only the aluminum cooling fins.
- Positioning the Room Sensor: Let the remaining black ambient temperature probe hang freely in the center of the cooler, away from direct cold air blasts coming from the A/C louvers.
Programming and Initial Calibration
- Plug the window air conditioner into its dedicated 15-amp or 20-amp grounded electrical outlet.
- Turn the air conditioner on using its native buttons:
- Set Mode to COOL (never Eco, Energy Saver, or Auto).
- Set Fan Speed to HIGH (maximum air velocity across the coil is essential to prevent frost).
- Set Temperature to the lowest possible setting on the A/C display (typically 60°F or 62°F).
- Plug the CoolBot power supply into the wall.
- The CoolBot digital display will illuminate, showing the current room temperature.
- Press the SET button and use the arrow keys to choose your target temperature:
- For Mixed Leafy Greens, Brassicas, and Root Crops: Set to 36°F (2°C).
- For Cold-Sensitive Summer Crops (Tomatoes, Cucumbers, Squash): Set to 50°F to 55°F (10°C to 13°C).
Within two minutes, the CoolBot's red heater LED will illuminate, the compressor will engage, and ice-cold air will begin flooding your cooler room.
Temperature and Humidity Management for Maximum Produce Shelf Life
Cooling produce is only half the battle. If your cold storage room has low relative humidity, the cold, dry air will literally suck moisture out of your vegetables through transpiration, turning crisp celery, kale, and carrots limp and rubbery within forty-eight hours.
The Two Post-Harvest Cold Regimes
Different vegetable families have drastically different physiological storage requirements:
| Storage Regime | Target Temp | Relative Humidity | Compatible Crops | Incompatible Crops (Do NOT Store Here!) |
|---|---|---|---|---|
| Regime A: Deep Cold & High Humidity | 34°F - 38°F (1°C - 3°C) | 90% - 95% RH | Lettuce, spinach, kale, arugula, broccoli, carrots, radishes, salad turnips, cilantro, scallions. | Tomatoes, winter squash, peppers, sweet potatoes, basil (they suffer catastrophic chilling injury). |
| Regime B: Cool Cellar / Ambient | 50°F - 55°F (10°C - 13°C) | 60% - 70% RH | Heirloom tomatoes, eggplants, bell peppers, cucumbers, summer squash, melons, fresh basil. | Leafy greens (they yellow and rot within 4 days at 55°F). |
If you grow diverse market garden crops, your CoolBot cooler should be dedicated to Regime A (36°F), which preserves your highest-value, most perishable leafy greens and bunched roots. Store your tomatoes, squash, and basil in a shaded, well-ventilated packing room at 55°F to 60°F.
Maintaining 95% Relative Humidity
Window air conditioners naturally dehumidify air as they cool. To maintain the 90% to 95% relative humidity required to keep greens crisp for up to two weeks:
- Cover Harvest Lugs: Store washed, spun salad greens and bunched roots in food-grade plastic vented harvest totes lined with clean, damp cotton towels or covered with loose plastic crate liners. This creates a 98% micro-humidity pocket inside the tote while allowing ethylene gas to escape.
- Commercial Ultrasonic Humidifier: Install a commercial ultrasonic mist maker or reptile fogger wired to a digital humidistat (set to 90% RH). Ultrasonic humidifiers atomize water droplets without heating the air, replenishing humidity that the A/C coil pulls out.
- Wet Floor Technique: In a well-built cooler with a sealed concrete or non-slip vinyl deck, you can simply pour a five-gallon bucket of clean water across the floor every morning. The high-velocity A/C fan evaporates that floor water into the ambient air, maintaining humidity naturally.
Use our interactive Local Planting Calendar to schedule succession sowings and predict your peak weekly harvest storage volumes before building your cooler shelves.
Interior Organization: Wire Racking, Drainage, and Workflow
A messy, disorganized cooler wastes labor and results in forgotten produce rotting in back corners. Design the interior layout with the same commercial discipline as a professional restaurant walk-in:
8x8-Foot Cooler Floor Plan Architecture
┌────────────────────────── 8 Feet ──────────────────────────┐
│ [Window A/C & CoolBot]                                    │
│ ┌──────────────────────┐        ┌───────────────────────┐ │
│ │ 18"x48" Wire Shelf   │        │ 18"x48" Wire Shelf    │ │
│ │ (Leafy Greens & Roots)│  Aisle │ (Berries & Specialty) │ │
│ └──────────────────────┘ (36")  └───────────────────────┘ │
│ ┌──────────────────────┐        ┌───────────────────────┐ │
│ │ 18"x48" Wire Shelf   │        │ 18"x48" Wire Shelf    │ │
│ │ (Eggs & Cut Flowers) │        │ (Bulk Storage Totes)  │ │
│ └──────────────────────┘        └───────────────────────┘ │
│                                                           │
│                     [Inswing Steel Door]                  │
└─────────────────────── [PVC Strips] ──────────────────────┘
- NSF-Certified Chrome or Epoxy Wire Shelving: Never use raw wood shelving inside a 95% humidity cooler; wood absorbs moisture and grows mold. Standard commercial wire shelving allows 360-degree air circulation around every crate.
- Standardized Harvest Lugs: Standardize on interlocking, nestable plastic vented harvest lugs (such as 1.7-bushel Agri-Lugs). They stack securely four units high, protecting delicate produce from being crushed while allowing cold air to circulate through side vents.
- Color-Coded Inventory Labeling: Use color-coded painter's tape on crate handles: Blue tape for Monday restaurant delivery; Green tape for Friday harvest destined for Saturday Farmers Market. Write the crop variety, harvest date, and harvest weight on every single crate.
Detailed Capital Expenditure Budget: CoolBot vs. Commercial Condenser
Here is the exact cost comparison between building a DIY CoolBot walk-in cooler versus hiring a commercial HVAC refrigeration contractor for an 8x8-foot facility:
| Component / Expense | DIY CoolBot Walk-In (8x8 ft) | Turnkey Commercial Walk-In (8x8 ft) |
|---|---|---|
| Framing Lumber (2x4s, Plates, Screws) | $220 | Included in panel kit |
| R-26 Rigid Polyiso Foam (Two 2-inch Layers) | $580 | Prefab foam panels: $4,500 |
| Aluminum Sealing Tape & Spray Foam | $75 | Included |
| Pre-Hung Insulated Exterior Steel Door | $280 | Commercial flush cooler door: $1,200 |
| Interior Vinyl Strip Curtains | $85 | Commercial strip curtain: $150 |
| Cooling Engine | 12,000 BTU Frigidaire Window A/C: $380 | 1.5 HP Condensing Unit & Evaporator: $3,800 |
| Electronic Controller | CoolBot Digital Controller: $415 | Commercial mechanical thermostat: Included |
| Electrical Supplies & Wiring | Standard 110V Outlet: $40 | 220V Dedicated Service & Disconnect: $650 |
| Installation Labor | DIY (2 Weekends): $0 | Certified HVAC Technician Labor: $2,400 |
| Total Capital Investment | $2,075 | $12,700 |
| Annual Operating Energy Cost | ~$750 / year | ~$1,100 / year |
| Emergency Replacement Cost | New A/C from local store: $380 | Emergency commercial compressor service: $2,000+ |
By choosing the CoolBot route, you save over $10,000 in upfront capital, preserving your working cash flow for drip irrigation, greenhouse tunnels, precision seeders, and seed inventory.
Review our companion guides on transitioning from a hobby gardener to a commercial market gardener on a quarter acre, monetizing your garden with a roadside honor box, and launching an indoor microgreen enterprise to integrate your cold chain into a profitable multi-stream farm business.
The 4-Weekend Build Timeline: Step-by-Step
Building your cooler is an empowering carpentry project. Follow this four-weekend operational schedule to build your cold room without feeling overwhelmed:
CoolBot Walk-In Cooler Build Schedule
├── Weekend 1: Foundation, Floor & Wall Framing
│   ├── Level floor area; lay two 1.5-inch XPS foam layers; float cross-laminated plywood deck.
│   ├── Paint floor deck with non-slip polyurethane floor enamel.
│   └── Frame four 2x4 perimeter walls (24" O.C.) with rough openings for A/C and steel door.
├── Weekend 2: Ceiling Framing & Primary Insulation Layer
│   ├── Frame 2x6 ceiling joists; install first layer of 2-inch polyiso foam between framing.
│   ├── Apply expanding spray foam around all plate perimeters and electrical conduit boxes.
│   └── Hang pre-hung insulated steel door; shim, level, and screw into rough framing.
├── Weekend 3: Staggered Insulation, Foil Taping & Electrical
│   ├── Install second layer of 2-inch polyiso foam over walls and ceiling with staggered seams.
│   ├── Tape every single joint with heavy-duty UL-181A-P certified aluminum foil tape.
│   └── Cut A/C sleeve in wall; frame support sill; mount 12,000 BTU window unit and seal edges.
└── Weekend 4: CoolBot Wiring, Strip Curtains & Cold Run
    ├── Hang interior overlapping PVC strip curtains inside doorway.
    ├── Wire CoolBot heating element to A/C thermistor; insert blue frost probe into fins.
    ├── Assemble NSF chrome wire shelving racks; position ultrasonic humidifier.
    └── Execute 24-hour test run: calibrate temperature to 36°F and audit coil defrost cycles.
A DIY CoolBot walk-in cooler is the great democratizer of small-scale agriculture. It liberates independent growers from the crushing debt of industrial refrigeration, giving human-scale market farmers the cold-chain power to harvest crisp, immaculate, nutrient-dense produce that rivals the largest commercial farms on earth. Build it right, seal it tight, and let your harvest shine.
Expert Insights & FAQs
Can a window air conditioner really cool a room down to 36°F without freezing up?
Yes, when paired with a CoolBot controller. The CoolBot tricks the air conditioner's sensor to keep the compressor running, while a secondary frost sensor inserted into the cooling fins cuts power the moment frost begins to form, melting ice before it accumulates.
How much does it cost to build an 8x8-foot CoolBot walk-in cooler?
A complete DIY 8x8-foot walk-in cooler typically costs between $1,800 and $2,400, including framing lumber, R-26 rigid polyiso foam insulation, an insulated steel door, a new window A/C unit, and the CoolBot controller—saving over $10,000 compared to commercial refrigeration.
What size window air conditioner do you need for a walk-in cooler?
For a well-insulated (R-25+) 8x8-foot room, a standard 12,000 to 15,000 BTU window air conditioner is ideal. For a smaller 6x6-foot room, an 8,000 to 10,000 BTU unit works well, while a 10x12-foot cooler requires an 18,000 to 24,000 BTU unit (often 220V).
Can you use any window air conditioner with a CoolBot?
No. The unit must have digital controls and a standard single-stage rotary compressor. You cannot use inverter or variable-speed air conditioners (like Midea U-shape units), as their computerized frequency modulation is incompatible with CoolBot sensors.
Do you need to insulate the floor of a walk-in cooler built on a concrete slab?
Yes. Concrete acts as a massive thermal heat sink, conducting 55°F to 60°F ground heat upward into your cooler. Insulating the slab with two layers of rigid XPS foam beneath a floating plywood deck reduces electricity consumption by up to 25%.
How do you keep vegetables from drying out in a walk-in cooler?
Leafy greens and bunched roots require 90% to 95% relative humidity. Maintain humidity by storing produce in vented harvest lugs covered with damp towels or crate liners, installing an ultrasonic cool-mist humidifier, or keeping the floor deck damp.
What insulation is best for building a DIY walk-in cooler?
Foil-faced polyisocyanurate (Polyiso) rigid foam is the industry gold standard. Two layers of 2-inch polyiso provide an outstanding R-26 thermal barrier, while the foil facing acts as an impermeable vapor barrier that reflects radiant heat.
How much electricity does a CoolBot cooler use compared to commercial refrigeration?
An insulated 8x8-foot CoolBot cooler with a 12,000 BTU window unit typically draws between 12 and 18 kWh per day ($1.80 to $2.70 daily), which is roughly 25% to 35% less electrical energy than an industrial 1.5-horsepower commercial condensing unit.
Johnnie McCormick
Zone 7b/8a - North Central Alabama
Johnnie McCormick is a gardening hobbyist and the founder of My Garden Spot. Raised in north-central Alabama, his passion for gardening began in his youth. In 2008, he established a large market garden, teaching himself high-yield growing methods. In the years since, he has operated seasonal seedling sales for transplants, specializing in heirloom tomatoes, peppers, eggplants, decorative ground covers like Ajuga (Bugleweed), marigolds, nasturtiums, and fresh kitchen-window herb arrangements (basil, cilantro). Today, he gardens in the hills between Birmingham and Jasper, Alabama (Zone 7b/8a), sharing practical, community-focused gardening resources.
Verified Authoritative Citations & References
In alignment with our strict E-E-A-T research and verification guidelines, this guide cross-references data from the United States Department of Agriculture (USDA) and Cooperative Extension Service programs.
- USDA Agricultural Marketing Service (AMS): Community Supported Agriculture (CSA) standards and local market surveys. ams.usda.gov
- Penn State Extension: Small Farm Economics, financial planning, and crop pricing research documents. extension.psu.edu
- Cornell Cooperative Extension: Market gardening business planning and local sales guidelines. smallfarms.cornell.edu
- Alabama Cooperative Extension System (ACES): Local food regulations, CSA legal permits, and farm safety standards. aces.edu




Please log in to view comments.