How Do You Transplant Garden Seedlings for 100% Success and Zero Shock?

How Do You Transplant Garden Seedlings for 100% Success and Zero Shock?
The Soil Ecology Paradigm: Biological vs. Mechanical Cultivation
For decades, conventional agriculture has treated the soil as a sterile, physical medium whose primary purpose is to anchor plants and hold synthetic chemical inputs. Under this chemical-mechanical paradigm, tillage is viewed as a necessary annual practice to loosen compacted earth, incorporate crop residues, and destroy weed growth. However, modern soil ecology reveals that tillage is a highly destructive practice that compromises long-term soil structure, degrades organic matter, and collapses the soil food web. When soil is tilled, the sudden infusion of oxygen triggers a massive spike in bacterial activity. These bacteria rapidly metabolize the stored carbon in the soil, converting it into carbon dioxide gas, which escapes into the atmosphere. This process, known as carbon oxidation, continuously depletes the soil organic matter (SOM) that is vital for nutrient retention and water infiltration.
Furthermore, mechanical tillage physically pulverizes the structural units of the soil, known as soil aggregates. Healthy soil aggregates are bound together by organic glues, humic substances, and glomalin—a glycoprotein produced by mycorrhizal fungi. When these aggregates are crushed by a rototiller or plow, the soil particles (sand, silt, and clay) disperse. Upon contact with rain, these dispersed particles form a sealed surface crust that prevents water and air from entering the soil. Below the depth of tillage, the weight of the machinery creates a highly compacted layer known as a plow pan or hardpan. This layer acts as a physical barrier to plant roots and restricts drainage, leading to waterlogged soil and root rot. By contrast, a no-till system preserves the natural vertical channels created by earthworms and decomposing roots, allowing for optimal air circulation and water movement deep into the soil profile.
In addition to physical degradation, tillage systematically destroys the biological components of the soil. The soil food web is a complex ecosystem consisting of bacteria, fungi, protozoa, nematodes, microarthropods, and earthworms. Mycorrhizal fungi are particularly sensitive to tillage. These fungi form extensive networks of fine threads called hyphae that link plant roots to the surrounding soil, exchanging nutrients like phosphorus for plant-produced sugars. Tillage breaks these hyphal networks apart, forcing the fungi to continuously restart their growth and reducing the plant's ability to absorb nutrients. Tillage also favors bacteria over fungi, altering the soil's fungal-to-bacterial (F:B) ratio. While simple weeds and brassicas thrive in bacterial-dominated soils, high-value vegetable crops, perennial berries, and fruit trees require a fungal-dominated soil ecosystem to achieve optimal health, nutrient density, and disease resistance.
The Biological Foundations of Transplant Shock
To understand the mechanics of seedling transplanting, one must first explore the physiological phenomenon known as transplant shock. When a seedling is grown in the sheltered environment of an indoor nursery or greenhouse, it adapts to highly stable conditions. It receives regulated moisture, filtered light, and protection from mechanical stresses such as wind. Moving this tender organism directly into the open garden exposes it to immediate environmental stressors: intense ultraviolet radiation, rapid temperature fluctuations, drying winds, and soil-borne microbes. The plant's root system, which was confined to the smooth walls of a plastic cell, is suddenly expected to anchor the plant and draw moisture from a much larger, less uniform soil volume.
The primary driver of transplant shock is root hair destruction. Seedlings absorb the vast majority of their water and soluble nutrients through microscopic root hairs that protrude from the main root tips. These delicate, single-cell structures are incredibly fragile. During extraction from the transplant tray, even the gentlest handling can sever or dry out millions of root hairs. With its root surface area suddenly decimated, the seedling cannot absorb enough water to keep up with the transpiration demands of its leaves, leading to immediate turgor pressure loss. The plant wilts, its stomata close to prevent further water loss, and photosynthesis grinds to a halt. If this water deficit is prolonged, the leaves scorch, turn yellow, and die, severely stunting the plant's seasonal growth potential.
Transplant shock also triggers a cascade of hormonal responses. When root hairs are damaged, the roots stop producing auxins and cytokinins, which are the hormones responsible for leaf expansion and shoot growth. Instead, the plant begins producing abscisic acid (ABA) in the leaves. ABA acts as a stress signal, forcing the stomata to close and directing the plant's remaining energy reserves away from leaf production and toward emergency root repair. The plant enters a survival state, halting all vegetative progress. Minimizing this hormonal disruption requires keeping the root ball intact, ensuring that the root-microbe relationship is preserved, and preventing the tender roots from drying out for even a few seconds during the transition.
Physiological Indicators of Seedling Readiness
Determining exactly when a seedling is ready to leave the nursery is a critical skill. A common mistake among beginners is transplanting seedlings that are either too young and fragile, or too old and root-bound. The ideal developmental stage varies by plant family, but a general rule is that the seedling should have developed its first two to three sets of "true leaves." The first leaves to emerge from a germinating seed are the cotyledons, which are simple, seed-derived structures that provide energy until the plant can begin true photosynthesis. True leaves, which emerge after the cotyledons, have the characteristic shape and structure of the parent plant. Once the seedling has established several true leaves, its vascular system is developed enough to handle the stresses of transplanting.
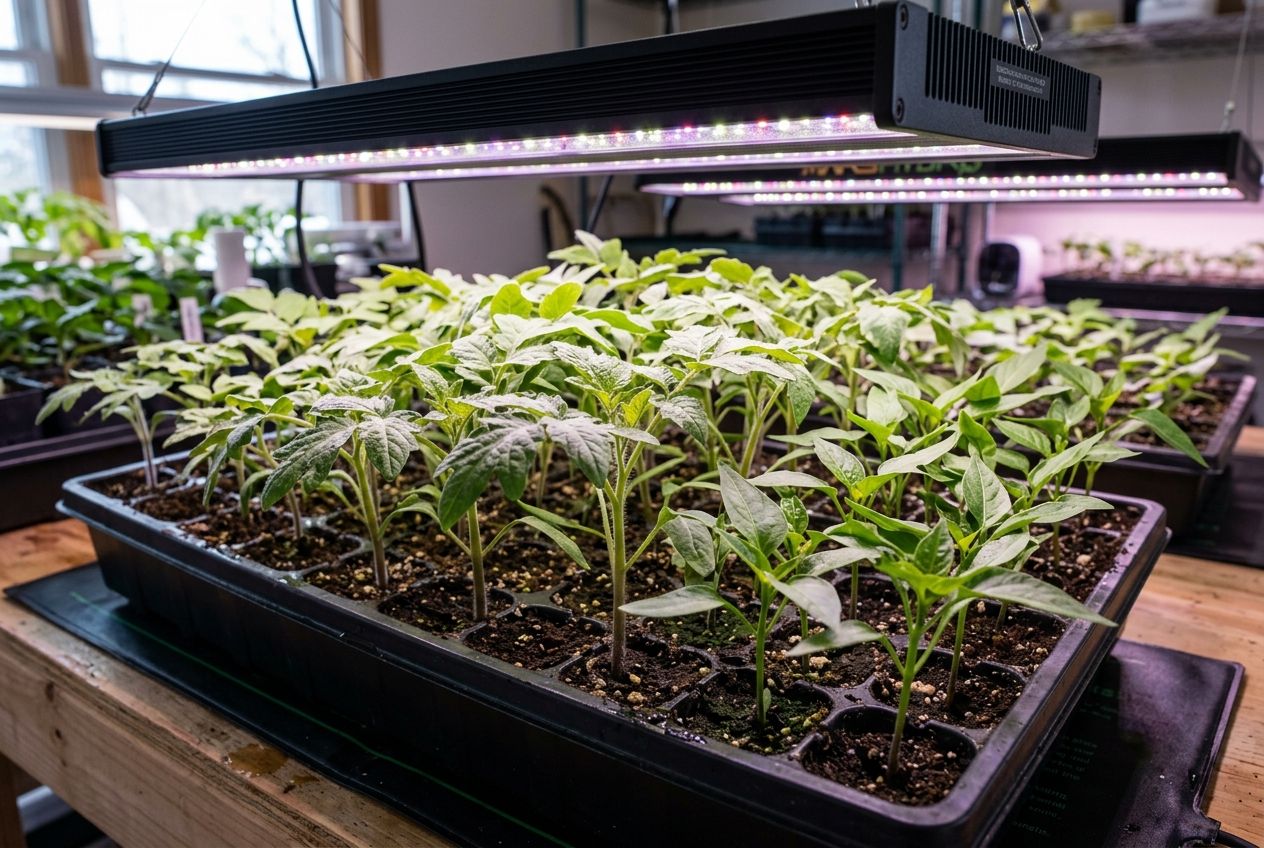
Another indicator of readiness is stem caliper, or thickness. A seedling with a thick, stocky stem is far more resilient than a tall, spindly, or "leggy" seedling. Legginess is caused by phototropism—the plant stretching toward a distant light source. Spindly stems lack the structural lignin needed to withstand outdoor winds and are easily snapped. Stockiness can be encouraged by placing lights close to the seedlings (2-3 inches for fluorescent bulbs, 12-18 inches for high-output LEDs) and using a gentle oscillating fan to simulate outdoor breezes, which triggers the plant to strengthen its stem tissue.
We must also inspect the root system. Gently slide a seedling out of its cell to examine the roots. The roots should be clean, white, and active, holding the potting soil together in a loose plug without wrapping around the perimeter of the cell. If the roots are thick, brown, and form a solid, tangled mat around the bottom and sides, the plant is root-bound. Root-bound plants struggle to establish themselves in the garden because their roots will continue to grow in a circular pattern rather than spreading outward into the surrounding soil. If you must transplant a root-bound seedling, you must gently tease the bottom roots apart to encourage outward growth, though this inevitably increases root hair damage.
The 10-Day Hardening-Off Protocol
The most important defense against transplant shock is the hardening-off process. Hardening-off is a systematic method of gradually exposing indoor-grown seedlings to outdoor conditions, allowing them to build physical tolerance to wind, sun, and temperature changes. During this process, the plant's leaves thicken their waxy outer cuticle layer, and the stems deposit lignin, creating a tough, wind-resistant structure.
A standard, professional-grade hardening-off timeline spans 7 to 10 days and must be followed precisely. On Day 1, place the seedlings outdoors in a sheltered, fully shaded location (such as a covered porch or under the canopy of a tree) for only 1 to 2 hours during the mildest part of the afternoon, then bring them back indoors. On Days 2 and 3, increase the outdoor time to 3 to 4 hours in the shade, allowing them to experience gentle ambient wind. On Days 4 and 5, move the plants into a location where they receive 1 hour of direct morning sunlight, followed by shaded conditions for the rest of the afternoon, extending their total outdoor time to 6 hours.
On Days 6 and 7, increase direct sunlight exposure to 3 to 4 hours, and leave the plants outdoors for the entire day, bringing them inside only at night. On Days 8 and 9, if there is no danger of frost, leave the seedlings outdoors overnight in a protected location. By Day 10, the plants should be fully acclimated and can remain outdoors in their trays until you are ready to plant. Throughout this protocol, monitor the potting soil moisture closely; cell trays dry out rapidly outdoors due to wind and direct sun, and letting the seedlings wilt during the hardening-off phase will undo all your progress.
Soil and Environmental Preparation
A successful transplant requires a welcoming soil environment. Before planting, the garden bed must be prepared to receive the seedlings. In a regenerative, no-till system, this preparation does not involve tilling the soil, which would destroy the biological structure. Instead, the grower prepares the bed by clearing any surface weeds using occultation tarps or a collinear hoe, applying a shallow layer of finished compost, and ensuring the soil is structurally loose and well-aerated.
Soil moisture balancing is a critical step. Never transplant seedlings into dry garden soil. Dry soil will pull moisture away from the seedling's root plug like a sponge, causing immediate dehydration. The planting bed should be thoroughly irrigated 24 hours before transplanting, allowing the water to drain through the soil profile until the bed is evenly moist but not waterlogged. The seedlings themselves should also be watered thoroughly a few hours before transplanting. A hydrated root plug is much easier to extract from the tray without root breakage and ensures the plant starts its outdoor life fully hydrated.
Temperature thresholds must also be respected. Every crop has a minimum soil temperature required for root development. For cool-season crops like brassicas, spinach, and lettuce, soil temperatures should be at least 45°F. For warm-season nightshades like tomatoes and peppers, soil temperatures must reach 60°F, and squash and melons prefer 65°F or warmer. Planting warm-season crops into cold soil will cause their roots to shut down, leading to nutrient deficiencies, purple-tinted leaves (phosphorus deficiency), and stunting that can take weeks to overcome. Use a simple soil thermometer inserted 4 inches deep to verify temperatures before planting.
Surgical Transplanting Methodology
The actual process of putting the seedling into the ground must be approached with the precision of a surgeon. The goal is to move the plant with zero disturbance to the root-soil interface. Start by digging a planting hole in the bed that is slightly wider than the seedling's root plug. The depth of the hole should match the height of the root plug exactly (with the exception of tomatoes, which can be buried deeper).
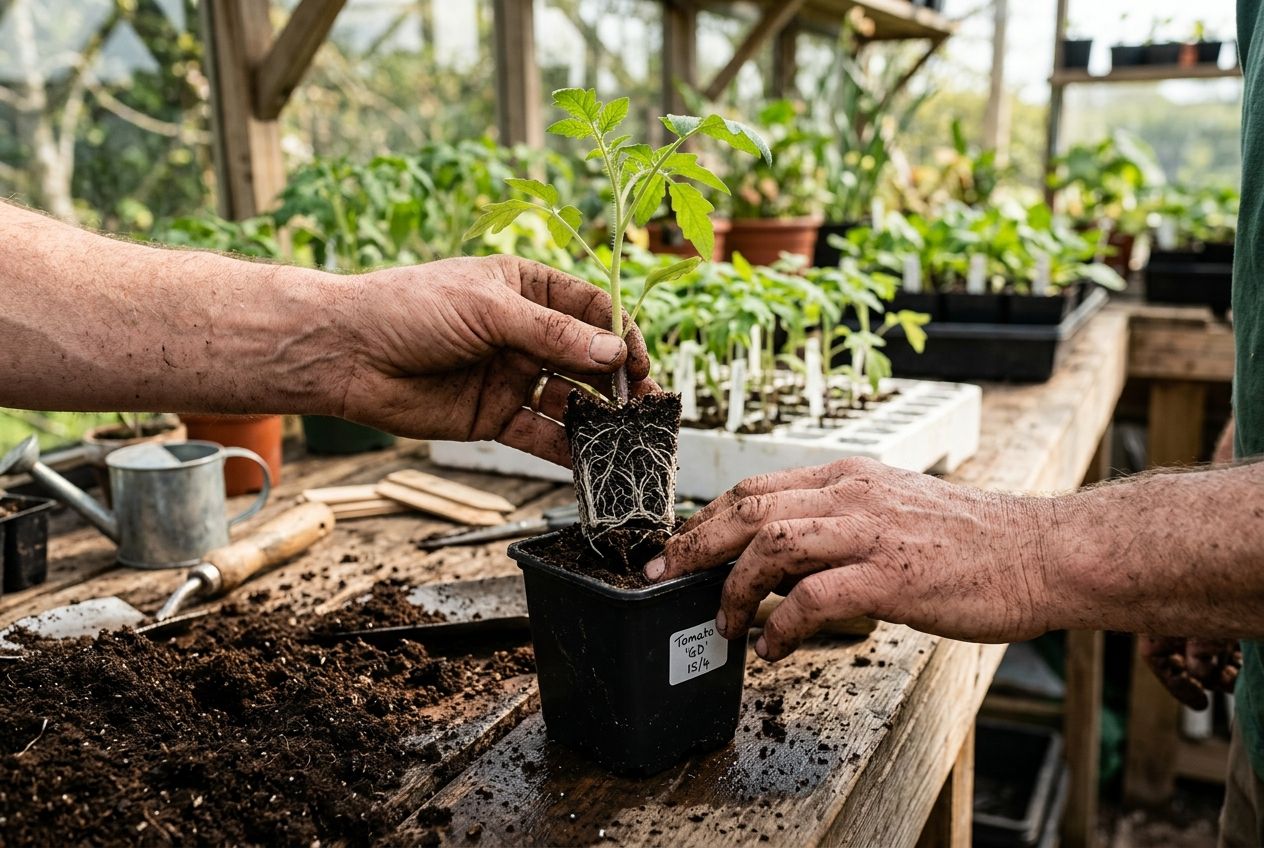
To extract the seedling, never pull the plant by its stem. The stem contains the vascular system (xylem and phloem) that carries water and food; crushing the stem will permanently damage these vessels and kill the plant. Instead, gently squeeze the sides of the cell to loosen the plug, and push up from the bottom hole of the tray. Tip the tray slightly and catch the root ball in your hand. If the seedling is stuck, use a butter knife or wooden plant label to slide down the side of the cell and release it.
Before placing the seedling in the hole, apply a small dust of mycorrhizal inoculants directly onto the root ball or into the planting hole. This ensures direct contact between the fungal spores and the plant roots, initiating the symbiotic relationship immediately. Lower the seedling into the hole, ensuring the roots are pointing downward and are not folded or "J-rooted." Fill the space around the plug with native soil or compost, pressing down gently with your fingers to eliminate air pockets. Do not press too hard, as compacting the soil around the young roots will restrict oxygen access and limit growth.
Post-Transplant Hydration and Nutrition
The moments immediately following transplanting are critical for the plant's survival. The first action must always be a deep watering. Even if the soil and root plugs were moist, watering-in is essential to settle the soil particles around the root ball, ensuring perfect contact between the roots and the surrounding earth. This water also fills any remaining micro-air pockets that would otherwise dry out the exposed root tips.
Use a gentle watering wand with a breaker nozzle to apply water at the base of the plant. Avoid spraying the leaves, as wet foliage combined with transplant stress increases susceptibility to fungal pathogens. Water deeply enough to saturate the entire root zone. For the first 3 to 5 days, monitor the transplants daily. The roots have not yet grown out of their potting plug, meaning they can only access water within that small volume. Even if the surrounding garden bed is moist, the root plug itself can dry out quickly. Keep the plug damp but not soggy.
Avoid applying heavy, synthetic nitrogen fertilizers immediately after transplanting. While it is tempting to feed the plants to encourage growth, high nitrogen levels force the plant to prioritize leafy, vegetative growth. Because the root system is currently compromised and repairing itself, it cannot support a massive flush of new leaves, leading to severe water stress and dieback. Instead, feed the transplants with a gentle, biologically active solution such as liquid seaweed, kelp extract, or compost tea. These inputs contain trace minerals and natural growth hormones (like auxins) that stimulate root elongation and cellular repair without forcing excessive top growth.
Crop-Specific Transplant Guidelines
Different vegetable families require specific handling during the transplanting process due to their unique root structures and growth habits.
1. Solanaceae (Tomatoes, Peppers, Eggplants)
Tomatoes are the most forgiving transplants in the garden because they have the ability to form adventitious roots along their stems. If a tomato seedling is tall and leggy, you can pinch off the lower leaves and bury the stem deep in the soil, leaving only the top cluster of leaves exposed. The buried stem will quickly sprout roots, creating a massive, deep root system. Peppers and eggplants, however, do not form adventitious roots easily and must be planted at the exact depth they were growing in their pots. Eggplants are highly sensitive to root disturbance and wind stress; protect them with row covers immediately after transplanting to preserve heat and moisture.
2. Cucurbitaceae (Squash, Zucchini, Melons, Cucumbers)
Cucurbits are notorious for their extreme sensitivity to root disturbance. They have taproot systems that do not tolerate being bound or severed. For this reason, many growers direct-sow cucurbits. If you choose to transplant them, start them in large, biodegradable pots (like paper pots or soil blocks) that can be planted directly into the ground without extracting the roots. Never let cucurbits become root-bound in the tray; they must be moved to the garden the moment their first true leaf emerges. Handle the root plugs with absolute care, ensuring the soil block does not break apart during the move.
3. Brassicaceae (Cabbage, Broccoli, Kale, Cauliflower)
Brassicas are tough, resilient transplants that tolerate a wide range of conditions. They have fibrous root systems that hold soil plugs together exceptionally well. They can be planted slightly deeper than their nursery depth (up to the first leaf node) to support their heavy top growth. When transplanting brassicas in the spring, watch out for cutworms—pests that chew through the stems of young seedlings at the soil level. Protect them by wrapping a small collar of cardboard or aluminum foil around the stem at the soil line, or planting through a landscape fabric barrier.
4. Alliaceae (Onions, Leeks, Shallots)
Allium seedlings present unique needs. Whether grown in cell trays or open flats as "bare-root" sets, onions and leeks should be transplanted when they are about the thickness of a pencil. When planting bare-root onions, gently shake them free from the starting medium, taking care not to tear the root plate. You should trim the root tips back to about one inch and cut the green tops back by one-third. This root-and-shoot pruning reduces transpiration stress, prevents the tall, thin leaves from falling onto the moist soil surface where they could rot, and stimulates lateral root branching once in the ground. Plant leeks in deep, narrow holes (trenching) to encourage the blanching of the lower stem.
5. Herbaceous Perennials and Woody Herbs (Mint, Oregano, Thyme, Sage)
Culinary herbs often have highly fibrous, dense root systems that can quickly fill nursery containers. When transplanting woody perennial herbs like rosemary, sage, or thyme, check for tight root mats. Unlike annual vegetables, these perennial roots can remain root-bound permanently if not teased apart. Use your fingers or a Hori Hori knife to score the root ball vertically in three or four places before planting, encouraging root exploration. Keep the soil well-drained and slightly less rich than vegetable beds, as excessive nitrogen reduces the aromatic oils that give these herbs their flavor.
Common Mistakes and Troubleshooting
Even with careful planning, errors can occur. Recognizing the signs of common transplant mistakes allows you to take corrective action before the plants are lost.
Wilting immediately after transplanting: If the plants wilt despite the soil being wet, this indicates severe root hair damage or air pockets around the root ball. The roots cannot draw water. Apply a diluted seaweed solution and provide temporary shade (such as an upturned cardboard box or shade cloth) for 2 to 3 days to reduce transpiration demand until the roots recover.
Leaves turning white or papery: This is a classic symptom of sunburn, or UV scorch, caused by poor hardening-off. The indoor-grown leaves lack the protective carotenoid pigments needed to handle direct sunlight. The damaged leaves will not recover, but if the growing tip is green, the plant will produce new, sun-tolerant leaves. Keep the soil moist and wait for new growth.
Purple-tinted leaves on tomatoes or peppers: As mentioned, this indicates phosphorus deficiency, which is almost always caused by cold soil temperatures restricting root uptake rather than a lack of phosphorus in the soil. Do not apply more fertilizer; instead, lay down black plastic mulch or clear row covers to warm the soil, and the plants will green up as root activity increases.
Conclusion
Mastering the art of transplanting is a cornerstone of high-yield, sustainable gardening. By treating transplanting as a precise physiological transition rather than a simple chore, you protect the biological integrity of your crops. Through proper timing, developmental monitoring, a dedicated hardening-off protocol, and surgical handling of the fragile root system, you can eliminate transplant shock entirely. Your seedlings will transition seamlessly from nursery to field, establishing deep, active root networks that support vigorous growth and abundant yields throughout the season.
Related Guides & Agronomic References
- To explore connected soil and crop strategies, see our deep-dive on seed starting protocols.
- For complete infrastructure setup and management, consult our guide on spring soil prep.
- To maintain season-long health and pest suppression, explore our analysis of heirloom tomato seedlings.
Expert Insights & FAQs
What physiological changes do seedlings undergo during the transplanting process?
During transplanting, seedlings experience acute stress, initiating a cascade of physiological changes. Root systems are inevitably damaged, disrupting water and nutrient uptake, which leads to a sharp decrease in water potential. This triggers hormonal responses, including increased abscisic acid (ABA) to close stomata and reduce transpiration, and a temporary halt in photosynthesis and growth.
How do you accurately determine when a seedling is ready for transplanting?
A seedling is ready for transplanting when it has developed at least two to three sets of true leaves, possesses a robust, well-formed root system that holds the soil plug intact but is not root-bound, and has a sturdy stem. Critically, it must also be properly hardened off to withstand outdoor conditions.
What is the step-by-step procedure for root-safe transplanting into the garden?
First, thoroughly water the seedling 1-2 hours before transplanting. Prepare a planting hole twice the width of the root ball and just as deep. Gently remove the seedling, handling it by the root ball or leaves, not the stem. Place it in the hole, ensuring it's at the same depth, then backfill with soil and water deeply.
How do soil moisture and watering schedules affect transplant success rates?
Optimal soil moisture is critical for transplant success. Pre-moistened soil prevents the dry garden bed from wicking moisture away from the root ball. Post-transplant, consistent, deep watering is required to maintain hydration for a damaged root system, preventing wilt and encouraging new root growth into the surrounding soil profile.
What role does root-zone temperature play in preventing transplant shock?
Root-zone temperature directly governs root metabolic activity, including water and nutrient uptake. Transplanting into soil that is too cold or too hot shocks the system, halting root function and exacerbating water stress. Maintaining optimal soil temperatures (e.g., 65-75°F for warm-season crops) is crucial for rapid root establishment and recovery.
How can you use organic soil amendments or inoculants to stimulate root development?
Organic amendments like compost provide slow-release nutrients and improve soil structure. Specific inoculants, such as mycorrhizal fungi and rhizobia bacteria, form symbiotic relationships with roots, dramatically increasing the absorption area for water and nutrients like phosphorus and nitrogen, which accelerates establishment and reduces stress.
What are the primary indicators of transplant shock and how do you treat them?
Primary indicators of transplant shock include wilting even in moist soil, leaf yellowing (chlorosis), scorching on leaf margins, and stunted or stopped growth. Treatment involves providing temporary shade, ensuring consistent soil moisture without waterlogging, and avoiding fertilization until the plant shows signs of new growth.
How does transplanting technique differ between delicate annuals and woody perennials?
Transplanting delicate annuals requires minimal root disturbance, as their fibrous systems are fragile. Woody perennials, however, often have deep taproots or extensive lateral roots that require a much larger and deeper root ball to be excavated to preserve the primary root structure for long-term survival and anchoring.
Johnnie McCormick
Zone 7b/8a - North Central Alabama
Johnnie McCormick is a gardening hobbyist and the founder of My Garden Spot. Raised in north-central Alabama, his passion for gardening began in his youth. In 2008, he established a large market garden, teaching himself high-yield growing methods. In the years since, he has operated seasonal seedling sales for transplants, specializing in heirloom tomatoes, peppers, eggplants, decorative ground covers like Ajuga (Bugleweed), marigolds, nasturtiums, and fresh kitchen-window herb arrangements (basil, cilantro). Today, he gardens in the hills between Birmingham and Jasper, Alabama (Zone 7b/8a), sharing practical, community-focused gardening resources.
Verified Authoritative Citations & References
In alignment with our strict E-E-A-T research and verification guidelines, this guide cross-references data from the United States Department of Agriculture (USDA) and Cooperative Extension Service programs.
- Cornell Cooperative Extension: Home Vegetable Gardening Guide and vegetable variety recommendations. gardening.cals.cornell.edu
- Penn State Extension: Master Gardener Manual and companion planting matrices. extension.psu.edu
- Alabama Cooperative Extension System (ACES): Raised bed construction plans and regional seed planting calendars. aces.edu
- USDA NRCS: Cover crops and biological soil health guidelines. nrcs.usda.gov
Please log in to view comments.